Vodo framework: Một framework AWS Infrastructure + CM + CI/CD khiến DevOps của bạn khác biệt
Giới thiệu
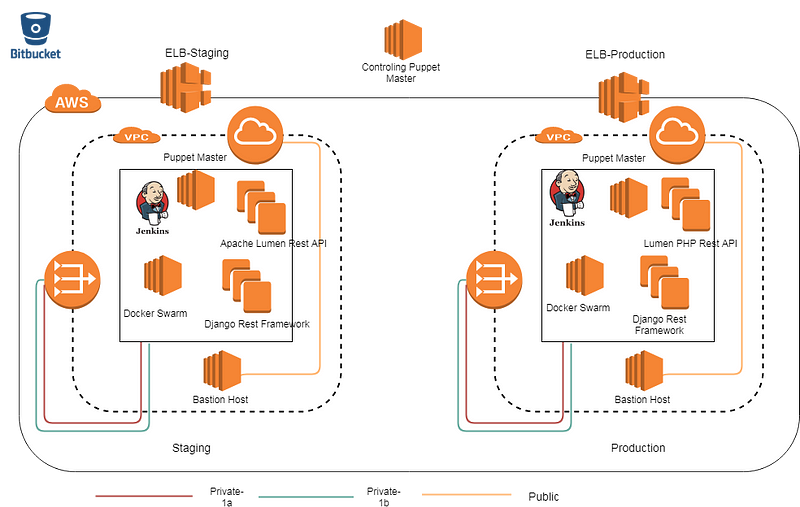
Mỗi khi bắt đầu một project mới, chúng ta cần phải làm tất cả AWS infrastructure trên nhiều môi trường (Dev-Stag-Prod) với nhiều microservices (Django, Lumen, docker, Wordpress…) + CI/CD tự động hóa hoàn toàn. Vì vậy, tôi đã phát triển ra Vodo Stack để code có thể tái sử dụng với nhiều projects khác nhau. Thứ duy nhất tôi cần là AWS Acess Key và một lệnh make để tạo ra AWS infrastructure stack và CI/CD một cách đầy đủ.Vd:
[root@puppet vodo]# make create-vodo-stack aws_profile=natrol.vn project_name=bauda aws_region=ap-southeast-1
[root@puppet vodo]# make create-vodo-stack aws_profile=blahblah.vn project_name=tequila aws_region=ap-southeast-2
Chi tiết yêu cầu sau khi chạy lệnh make:
- 2 public và 2 private subnets trên Availability Zone khác nhau
- 2 public subnets ra Internet thông qua AWS Internet Gateway
- 2 private subnets ra Internet thông qua AWS NAT Gateway
- Nhiều Microservices Clustering với stack khác nhau (Lumen PHP Rest, Django Rest Framework, Docker MicroServices…) có tag_role tự động join vào CM (Chef/Puppet…), trong nhiều môi trường. Mỗi một môi trường có một CM
- Với mỗi Microservices cùng với ELB khác nhau sẽ được tự động gắn vào nhóm AutoScaling khác nhau.
- Với mỗi Microservices triển khai CI/CD tự động hóa thì được triển khai theo luồng như sau: Dev -> git push -> Bitbucket -> WebHook -> Jenkins -> Trigger Jenkins-Slaves -> Chạy Ansible SSH -> Triển khai Infra/Code cho nhiều nodes phụ thuộc vào thẻ tag. Tùy theo từng nhánh, mà Jenkins sẽ trigger với Jenkins-slaves phù hợp để triển khai các ứng dụng dựa trên các vai trò.
Để làm tất cả những điều trên phải mất tầm 1 đến 2 tháng trong nhiều môi trường khác nhau.. Đó cũng là lí do vì sao tôi đã thực hiện Vodo Stack để làm việc được nhanh hơn 😊
Giải pháp
Có nhiều tools kết hợp cùng nhau để đáp ứng đầy đủ các yêu cầu (Ansible, Terraform, Puppet, Chef…) là cái mà sử dụng các tags map với các roles để triển khai chúng. (Vd: roles: jenkins, ansible, lumen,django, base). Với cá nhân tôi, thì Chef/Ansible +Terraform là công nghệ hiện đại được ưu tiên số 1 nhưng cậu con trai bé nhỏ của tôi lại thích chương trình puppet kids nên tôi đã sử dụng Puppet cùng với một chút sự trợ giúp của Ansible (một ngôi sao trẻ đấy J). Sau đây là một số lí do tại sao lại kết hợp Puppet + Ansible:
- Tại sao lại là puppet: Puppet dùng để quản lý cấu hình nhằm lấy playbook về cùng với tính năng auto-scale dựa trên các tags: (tags: env=dev, project=vodo, roles=jenkins,init=yes), chúng ta có bootstrap script để lấy tag và kết nối tới puppet master đối với mỗi môi trường dựa trên project.
Sau đó, dựa trên các roles (lấy từ AWS Tag), agent sẽ được triển khai cùng với các puppet modules phù hợp. Nhưng puppetlabs.aws module thì không được hỗ trợ đầy đủ cho tất cả các AWS API. Vì thế, tôi đã phải sử dụng aws cli cho việc autoscaling và ELB. Và đây là một lỗi mà tôi đã tạo ra cho module auto-scale trong quá trình tạo ra playbook.
https://github.com/puppetlabs/puppetlabs-aws/issues/502

- Tại sao lại là Ansible: Trong khi triển khai CI/CD với Jenkins, Jenkins trigger với Jenkins-slaves để triển khai cấu hình cho nhiều EC2. Vậy làm thế nào để Jenkins-slaves ssh đến nhiều nhiều EC2 song song? Chúng ta có thể sử dụng Puppet MCollective trên jenkins-slaves để chạy lệnh ssh đến EC2 hoặc Puppet Interval time để kéo cấu hình về nhưng tôi không quen với MCollective hơn Ansible vì thế tôi chọn Ansible. Đối với Puppet Interval time, thì bao lâu là đủ? (30 phút để kéo cấu hình về hay chỉ 5 phút? (Tất cả chúng ta thì lại không muốn chờ 😊). Giải pháp hiện tại đã được viết cho cả Puppet, Ansible chỉ trigger
ansible-playbook invoke_puppet.yml -e env={puppet-environment} role=${any_role} deployment_env={dev-or-staging-or-prod}` dựa trên nhánh trigger bởi bitbucket.
Cách thức triển khai
Tôi tách ra làm 3 phần
- Triển khai AWS infrastructure
- Triển khai puppet roles playbook ((django, lumen, docker, wordpress, jenkins…)
- Triển khai CI/CD
Triển khai AWS Infrastructure
Tôi đã lên kế hoạch tái sử dụng code cho những dynamic project, vì vậy chúng ta cần chuyển các tham số tới puppet modules. Tôi giả định rằng tất cả chúng ta đã biết sử dụng Puppet modules. Tôi tạo một Makefile:
[root@puppet vodo]# cat Makefile
create-vodo-stack:
export AWS_PROFILE=$(aws_profile); export FACTER_project_name=$(project_name); export FACTER_aws_region=$(aws_region); export FACTER_domain_name=$(domain_name); \
 puppet apply — hiera_config=/etc/puppetlabs/puppet/hiera.yaml — modulepath=`pwd`/modules -e ‘include tepco’ — environment=vodo

[root@puppet vodo]# tree modules/tepco/
modules/tepco/
├── files
│   ├── ec2_block_device_mapping.json
│   ├── ec2_trusted_policy_iam_roles.json
│   └── tepco_deploy_log.log
├── manifests
│   ├── create_tepco_applications_loadbalancer.pp
│   ├── create_tepco_autoscaling_group.pp
│   ├── create_tepco_bastion.pp
│   ├── create_tepco_iam_roles.pp
│   ├── create_tepco_jenkins.pp
│   ├── create_tepco_jenkins_slaves.pp
│   ├── create_tepco_key_pair.pp
│   ├── create_tepco_nat_gateway.pp
│   ├── create_tepco_puppet_master.pp
│   ├── create_tepco_routetable.pp
│   ├── create_tepco_security_group.pp
│   ├── create_tepco_stack.pp
│   ├── create_tepco_wordpress.pp
│   ├── create_test_template.pp
│   ├── init.pp
│   └── tepco_stack_information.pp
└── templates
    ├── tepco-bastion-user-data-init-script.erb
    ├── tepco-node-user-data-init-script.erb
    └── tepco-puppet-master-user-data-init-script.erb

3 directories, 22 files
Với Makefile phía trên, chúng ta có thể tái sử dụng code với nhiều project khác nhau với AWS Account khác nhau
[root@puppet vodo]# make create-vodo-stack aws_profile=natrol.vn project_name=electronic aws_region=ap-southeast-1 domain_name=natrol.vn
export AWS_PROFILE=natrol.vn; export FACTER_project_name=electronic; export FACTER_aws_region=ap-southeast-1; export FACTER_domain_name=natrol.vn;  \
puppet apply --hiera_config=/etc/puppetlabs/puppet/hiera.yaml --modulepath=`pwd`/modules -e 'include tepco' --environment=vodo
Hãy kiểm tra việc triển khai phối hợp với file init.pp trên các modules tepco:
[root@puppet vodo]# cat modules/tepco/manifests/init.pp
class tepco {

# Variable definition:
  $random_id=generate('/bin/date', '+%s')
  $init_env=hiera('tepco.env','NA')                 # dev-staging-prod
  $init_role=hiera('tepco.environment_name','NA')   # puppet-master role
  $init_domain=hiera('tepco.domain','NA')           # Domain name
  $init_project_name=hiera('tepco.name','NA')       # Each domain have multiple project
  $init_subnet_type=hiera('tepco.subnet_type','NA')
  $init_region=hiera('tepco.region','NA')
  $init_iam_role_name="Puppet-Master-Roles-IAM-S3-EC2"
  $roles=hiera('vodo.tag_app','NA')                 # Get full roles jenkins,wordpress,puppet-master,jenkins-slaves,bastion
notify {"INIT Notify":
   message => "env=${init_env} role=${init_role} domain=${init_domain} project=${init_project_name} subnet_type=${init_subnet_type} region=${init_region} iam_role=${init_iam_role_name}",
  }
# Include roles:
     include tepco::create_tepco_stack
     include tepco::create_tepco_nat_gateway
     include tepco::create_tepco_routetable
     include tepco::create_tepco_security_group
     include tepco::create_tepco_key_pair
     include tepco::create_tepco_iam_roles
     include tepco::create_tepco_puppet_master
     #include tepco::create_tepco_wordpress
     #include tepco::create_tepco_jenkins
     #include tepco::create_tepco_jenkins_slaves
     include tepco::create_test_template
     include tepco::create_tepco_bastion
     include tepco::create_tepco_applications_loadbalancer
     include tepco::create_tepco_autoscaling_group
     include wordpress::tepco_stack_information
}
Từ tất cả cả các include ở trên, chúng ta có thể thấy create_tepco_stack (VPC-Subnets-Internet-Gateway) sau đó là Nat Gateway, Routetable, Sercuritygroup rồi đến các IAM roles.
Mẫu create_tepco_stack (VPC, 4 subnet, internet gateway cùng với VPC)
class tepco::create_tepco_stack inherits tepco{

# Run on all environment get variable init_env from init.pp
  $init_env.each |Integer $index, String $env_value| {
    $init_bucket="${env_value}.${init_role}.${init_domain}"
    $init_vpc="vpc-${env_value}-${init_project_name}"
    $init_subnet="subnet-${env_value}-${init_project_name}"
    exec {"create s3://${init_bucket}":
      path => ['/bin/','/usr/bin',],
      unless => "aws s3 ls | grep ${init_bucket}",
      command => "aws s3 mb s3://${init_bucket}",
   }

   exec {"copy puppet installation file to s3://${init_bucket}/Puppet_Novatti_Installation":
     path => ['/bin','/usr/bin','/sbin',],
     cwd => '/etc/puppetlabs/code/environments/vodo',
     command => "aws s3 sync Puppet_Novatti_Installation/ s3://${init_bucket}/Puppet_Novatti_Installation/",
     #unless => "aws s3 ls s3://${init_bucket}/Puppet_Novatti_Installation/ | grep puppet",
     require => Exec["create s3://${init_bucket}"],
   }

ec2_vpc {"${init_vpc}":
 ensure => present,
 region => "${init_region}",
 cidr_block => hiera("tepco.vpc.${env_value}",'NA'),
 tags => {
 env => "${env_value}" ,
 },
 }
 $init_subnet_type.each |Integer $index1, String $type_value| {
 ec2_vpc_subnet { "${env_value}-subnet-${type_value}-${init_project_name}":
 ensure => present,
 region => hiera('tepco.region','NA'),
 cidr_block => hiera("tepco.subnet_range.${env_value}.${type_value}",'NA'),
 availability_zone => hiera("tepco.az.${type_value}"),
 vpc => "${init_vpc}",
 tags => {
 env => "${env_value}",
 },
 require => Ec2_vpc["${init_vpc}"],
 }
 }

ec2_vpc_internet_gateway {"create-${env_value}-igw-${init_project_name}":
 name => "${env_value}-igw-${init_project_name}",
 region => "${init_region}",
 vpc => "vpc-${env_value}-${init_project_name}",
 require => Ec2_vpc["${init_vpc}"],
 }

 }
}
Giai đoạn 2: Deply EC2 dựa trên Roles Definition
Bây giờ, mỗi môi trường đã có 1 puppet, làm sao để EC2 có thể kết nối vào puppet động đó thậm chí cả khi puppet IP đã đổi ở mỗi môi trường. Chúng ta cần một user-data script trong khi tạo ra EC2 để cài đặt các gói cơ bản và một bootstrap script để kết nối EC2 vào puppet. Puppet có một external facter key=value thông qua script, chúng ta có thể sử dụng để lấy tag từ Puppet và gán vào Puppet Facter:
https://www.puppetcookbook.com/posts/what-are-external-facts.html
[root@puppet centos]# cat /opt/puppetlabs/facter/facts.d/node_facter.sh
#!/usr/bin/perl

#Build Up Facts for Factor
$instance_id = `curl -s http://169.254.169.254/latest/meta-data/instance-id`;
chomp $instance_id;
print "ec2_tag_instance_id=$instance_id\n";

$region_id = `curl -s http://169.254.169.254/latest/dynamic/instance-identity/document|grep region|awk -F '\"' '{print \$4}'`;
chomp $region_id;
print "ec2_tag_region_id=$region_id\n";

$region_id_full = `curl -s http://169.254.169.254/latest/meta-data/placement/availability-zone`;
chomp $region_id_full;
print "ec2_tag_region_id_full=$region_id_full\n";

$server_role = `aws ec2 describe-tags --filters "Name=resource-id,Values=$instance_id" "Name=key,Values=role" --profile=dev --region=$region_id --output=text | cut -f5`;
chomp $server_role;
print "ec2_tag_server_role=$server_role\n";

$init = `aws ec2 describe-tags --filters "Name=resource-id,Values=$instance_id" "Name=key,Values=init" --region=$region_id --output=text | cut -f5`;
chomp $init;
print "ec2_tag_init=$init\n";
...
Trong site.pp of puppet, chúng ta thiết lập playbook dựa trên ec2_tag_role_server giống như bên dưới
node default {
  # This is where you can declare classes for all nodes.
  # Example:
  #   class { 'my_class': }
}

case $::ec2_tag_server_role {

"puppet-master" : {
 #include vodo_stack::install
 #include vodo_stack::test
 #include wordpress::docker_deploy
 include wordpress::tepco_stack_information
 }

"wordpress": {
 include wordpress
 include jenkins::minion
 }

"jenkins": {
 include jenkins::install
 include jenkins::minion
 }

"bastion": {
 include base
 }

"jenkins-slaves": {
 include base
 include jenkins::minion
 }

}
Vậy nên, căn bản là để kết nối EC2 với một role cụ thể với puppet, chúng ta sẽ làm theo luồng hướng dẫn dưới đây:
+ Tạo EC2 động với các tags ở launch configuration
tags => {
         domain => hiera('tepco.domain'),
         role => "${role_lc}",
         env => 'vodo',
         init => 'yes',
         deployment_env => "${env_value}",
         project_name => "${init_project_name}",
       },
Sau đó, trong user-data script, chúng ta sẽ tìm thấy puppet master thích hợp cho môi trường đó.
puppet_master_ip=$(/usr/bin/aws --region=<%= @init_region %> ec2 describe-instances --filter "Name=instance-state-code,Values=16" "Name=tag:init,Values=yes" "Name=tag:role,Values=<%= @init_role %>" "Name=tag:deployment_env,Values=<%= @env_value ? @env_value : 'dev' %>" "Name=tag:env,Values=vodo" --query "Reservations[0].Instances[0].PrivateIpAddress" --output text)
Và thêm to /etc/hosts:
echo "${puppet_master_ip} puppet.<%= @init_domain %> puppet" > /etc/hosts
Sau đó, chúng ta tạo ra một daemon để khởi động init_puppet:
$cmd = "/opt/puppetlabs/bin/puppet apply /etc/puppetlabs/code/host_config.pp >> /tmp/huy_puppet.log 2>&1 ";
   system($cmd);
   $cmd = "/opt/puppetlabs/bin/puppet agent --server $puppet_server --waitforcert 60 --test >> /tmp/join_puppet.log 2>&1 ";
   system($cmd);
Giai đoạn 3: CI/CD
Chúng ta đặt 1 jenkin-slaves (Ansible) vào ssh song song với Application Server và chạy dòng lệnh puppet agent -t sau khi nhận được web-hook từ jenkins. Lệnh nhập vào Jenkins build: `ansible-playbook invoke_puppet.yml -e env={puppet-environment} -e role=${any_role} -e deployment_env={dev-or-staging-or-prod}
Ansible playbook invoke_puppet.yml:
---
- name: Run command puppet on instance
  hosts: "tag_role_{{role}}:&tag_env_{{env}}:&tag_deployment_env_{{deployment_env}}"

gather_facts: no
 become: yes
 tasks:
 - name: Run command puppet on instance {{role}}-{{env}}-{{deployment_env}}

shell: >
 /opt/puppetlabs/bin/puppet agent -t
 register: puppet_agent_cmd
 failed_when: puppet_agent_cmd.rc == 1 or puppet_agent_cmd.rc > 2
Bởi vì puppet luôn trả về exit-code = 2 nếu có gì thay đổi, nhưng với Ansible exit-code = 2 có nghĩa là code failed. Jenkins sẽ báo build fail vì vấn đề này. Vì vậy, ở file invoke_puppet.yml chúng ta cần ngăn Ansible trả về exit code và thay bằng exit_code=0
Log test chạy Ansible playbook invoke_puppet.yml
[root@dev-vodo-jenkins-1522226856 ansible]# ansible-playbook invoke_puppet.yml -e role=wordpress -e env=vodo -e deployment_env=dev
PLAY [Run command puppet on instance]
**************************************************************
**************************************************************
***************************

TASK [Run command puppet on instance wordpress-vodo-dev]
**************************************************************
**************************************************************
********
changed: [172.21.201.243]
changed: [172.21.201.90]
changed: [172.21.200.239]

PLAY RECAP
****************************************************************
****************************************************************
******************************************************
172.21.200.239 : ok=1 changed=1 unreachable=0 failed=0
172.21.201.243 : ok=1 changed=1 unreachable=0 failed=0
172.21.201.90 : ok=1 changed=1 unreachable=0 failed=0
Cuối cùng, Log cho Jenkins webhook và trigger Slave-Jenkins:
=============================
Started by upstream project "xedap/dev-xedap-master-trigger" build number 6
originally caused by:
 Started by BitBucket push by local-huy
 Started by BitBucket push by local-huy
Building remotely on dev-slaves-jenkins-ansible (slaves dev xedap ansible) in workspace /home/centos/jenkins/workspace/xedap/dev-xedap-master-pipeline
 > git rev-parse --is-inside-work-tree # timeout=10
Fetching changes from the remote Git repository
 > git config remote.origin.url git@bitbucket.org:vododevops/xedap.git # timeout=10
Fetching upstream changes from git@bitbucket.org:vododevops/xedap.git
 > git --version # timeout=10
using GIT_SSH to set credentials dev-xedap-read-only-key-bitbucket
 > git fetch --tags --progress git@bitbucket.org:vododevops/xedap.git +refs/heads/*:refs/remotes/origin/*
 > git rev-parse refs/remotes/origin/master^{commit} # timeout=10
 > git rev-parse refs/remotes/origin/origin/master^{commit} # timeout=10
Checking out Revision 7042eb287be05bb97e3c48ddca1c2b8870be771d (refs/remotes/origin/master)
 > git config core.sparsecheckout # timeout=10
 > git checkout -f 7042eb287be05bb97e3c48ddca1c2b8870be771d
Commit message: "Merged in staging (pull request #13)"
 > git rev-list --no-walk d0426ee799caf9ff91dfea699eb883c5bd9357d3 # timeout=10
[dev-xedap-master-pipeline] $ /bin/sh -xe /tmp/jenkins7293139606918007223.sh
+ echo 7042eb287be05bb97e3c48ddca1c2b8870be771d
7042eb287be05bb97e3c48ddca1c2b8870be771d
+ echo origin/master
origin/master
+ cd /opt/ansible
+ ansible-playbook invoke_puppet.yml -e role=jenkins -e env=vodo -e deployment_env=dev

PLAY [Run command puppet on instance]
****************************************

TASK [Run command puppet on instance jenkins-vodo-dev]
*************************

changed: [172.21.200.178]

PLAY RECAP
*********************************************************************
172.21.200.178 : ok=1 changed=1 unreachable=0 failed=0

+ cd /opt/ansible
+ ansible-playbook invoke_puppet.yml -e role=wordpress -e env=vodo -e deployment_env=dev

PLAY [Run command puppet on instance]
****************************************

TASK [Run command puppet on instance wordpress-vodo-dev]
***********************

changed: [172.21.200.6]

PLAY RECAP
*********************************************************************
172.21.200.6 : ok=1 changed=1 unreachable=0 failed=0

Finished: SUCCESS
Chúng ta đã làm xong:
Bây giờ chúng ta đã hoàn toàn là một DevOps lười biếng rồi đấy, mỗi lần bắt đầu một project mới thì sẽ không cần tốn quá nhiều thời gian để thiết kế hay build AWS infrastructure nữa (Public,private subnet, internet gateway, nat gateway, routeable, Elastic Loadbalancer, AutoScale, CI/CD …) ngoại trừ một số thứ đặc trưng hơn chúng ta sẽ thêm vào playbook mới. Chúng ta sẽ tiết kiệm được thời gian làm những công việc khác như cải thiện năng suất, bảo mật, phân tích kinh doanh… Stack phổ biến thường được xây dựng với 1 lệnh make và khoảng 5~7p chạy:
[root@puppet vodo]# make create-vodo-stack aws_profile=natrol.vn project_name=electronic aws_region=ap-southeast-1 domain_name=natrol.vn
export AWS_PROFILE=natrol.vn; export FACTER_project_name=electronic; export FACTER_aws_region=ap-southeast-1; export FACTER_domain_name=natrol.vn;  \
puppet apply --hiera_config=/etc/puppetlabs/puppet/hiera.yaml --modulepath=`pwd`/modules -e 'include tepco' --environment=vodo
Warning: The function 'hiera' is deprecated in favor of using 'lookup'. See https://docs.puppet.com/puppet/4.10/reference/deprecated_language.html
   (file & line not available)
Warning: /etc/puppetlabs/puppet/hiera.yaml: Use of 'hiera.yaml' version 3 is deprecated. It should be converted to version 5
   (in /etc/puppetlabs/puppet/hiera.yaml)
Notice: Compiled catalog for puppet.novattitma.com in environment vodo in 0.74 seconds
Notice: env=[dev] role=puppet-master domain=natrol.vn project=electronic subnet_type=[public-1a, public-1b, private-1a, private-1b] region=ap-southeast-1 iam_role=Puppet-Master-Roles-IAM-S3-EC2
Notice: /Stage[main]/Tepco/Notify[INIT Notify]/message: defined 'message' as 'env=[dev] role=puppet-master domain=natrol.vn project=electronic subnet_type=[public-1a, public-1b, private-1a, private-1b] region=ap-southeast-1 iam_role=Puppet-Master-Roles-IAM-S3-EC2'
Notice: /Stage[main]/Tepco::Create_tepco_stack/Exec[copy puppet installation file to s3://dev.puppet-master.natrol.vn/Puppet_Novatti_Installation]/returns: executed successfully
Notice: /Stage[main]/Tepco::Create_tepco_stack/Ec2_vpc[vpc-dev-electronic]/ensure: created
Notice: /Stage[main]/Tepco::Create_tepco_stack/Ec2_vpc_subnet[dev-subnet-public-1a-electronic]/ensure: created
Notice: /Stage[main]/Tepco::Create_tepco_stack/Ec2_vpc_subnet[dev-subnet-public-1b-electronic]/ensure: created
Notice: /Stage[main]/Tepco::Create_tepco_stack/Ec2_vpc_subnet[dev-subnet-private-1a-electronic]/ensure: created
Notice: /Stage[main]/Tepco::Create_tepco_stack/Ec2_vpc_subnet[dev-subnet-private-1b-electronic]/ensure: created
Notice: /Stage[main]/Tepco::Create_tepco_stack/Ec2_vpc_internet_gateway[create-dev-igw-electronic]/ensure: created
Notice: /Stage[main]/Tepco::Create_tepco_nat_gateway/Exec[create-nat-gateway-dev-electronic-and-elastic-ip]/returns: executed successfully
Notice: Please wait in 60 seconds
Notice: /Stage[main]/Tepco::Create_tepco_nat_gateway/Notify[Wait for nat-gateway-dev UP]/message: defined 'message' as 'Please wait in 60 seconds'
Notice: /Stage[main]/Tepco::Create_tepco_nat_gateway/Exec[create-tag-nat-gateway-dev]/returns: executed successfully
Notice: /Stage[main]/Tepco::Create_tepco_routetable/Ec2_vpc_routetable[create-dev-routetable-electronic-private]/ensure: created
Notice: /Stage[main]/Tepco::Create_tepco_routetable/Ec2_vpc_routetable[create-dev-routetable-electronic-public]/ensure: created
Notice: /Stage[main]/Tepco::Create_tepco_routetable/Exec[associate-subnet-public-dev]/returns: executed successfully
Notice: /Stage[main]/Tepco::Create_tepco_routetable/Exec[associate-subnet-private-dev]/returns: executed successfully
Notice: Please wait in 60 seconds
Notice: /Stage[main]/Tepco::Create_tepco_routetable/Notify[Wait for route-table-is-configured]/message: defined 'message' as 'Please wait in 60 seconds'
Notice: /Stage[main]/Tepco::Create_tepco_routetable/Exec[create private route table nat gateway dev]/returns: executed successfully
Notice: /Stage[main]/Tepco::Create_tepco_security_group/Ec2_securitygroup[sg_dev_electronic_allow_all]/ensure: created
Notice: /Stage[main]/Tepco::Create_tepco_key_pair/Exec[copy-dev-electronic_id_rsa-to-S3]/returns: executed successfully
Notice: /Stage[main]/Tepco::Create_tepco_puppet_master/Ec2_instance[dev-puppet-master-electronic]/ensure: changed absent to running
Notice: Waiting in 30 seconds
Notice: /Stage[main]/Tepco::Create_tepco_puppet_master/Notify[Wait-dev-puppet-master-electronic-up]/message: defined 'message' as 'Waiting in 30 seconds'
Notice: /Stage[main]/Tepco::Create_tepco_puppet_master/Exec[Wait-dev-puppet-master-electronic-Running]/returns: executed successfully
Notice: /Stage[main]/Tepco::Create_test_template/File[test template wordpress dev]/content: content changed '{md5}eb7a9da73bf9f5aecb3ad65e88b345b0' to '{md5}5c6d137c14c9bbc41f4c4f73ea93b731'
Notice: /Stage[main]/Tepco::Create_tepco_bastion/Ec2_instance[dev-bastion-electronic]/ensure: changed absent to running
Notice: /Stage[main]/Tepco::Create_tepco_applications_loadbalancer/Exec[create-dev-elb-wordpress]/returns: executed successfully
Notice: /Stage[main]/Tepco::Create_tepco_applications_loadbalancer/Exec[create-dev-target-group-elb-wordpress]/returns: executed successfully
Notice: /Stage[main]/Tepco::Create_tepco_applications_loadbalancer/Exec[register-listen-to-target-group-dev-elb-wordpress]/returns: executed successfully
Notice: /Stage[main]/Tepco::Create_tepco_applications_loadbalancer/Exec[set-security-group-to-dev-elb-wordpress]/returns: executed successfully
Notice: /Stage[main]/Tepco::Create_tepco_applications_loadbalancer/Exec[create-dev-elb-jenkins]/returns: executed successfully
Notice: /Stage[main]/Tepco::Create_tepco_applications_loadbalancer/Exec[create-dev-target-group-elb-jenkins]/returns: executed successfully
Notice: /Stage[main]/Tepco::Create_tepco_applications_loadbalancer/Exec[register-listen-to-target-group-dev-elb-jenkins]/returns: executed successfully
Notice: /Stage[main]/Tepco::Create_tepco_applications_loadbalancer/Exec[set-security-group-to-dev-elb-jenkins]/returns: executed successfully
Notice: /Stage[main]/Tepco::Create_tepco_autoscaling_group/Exec[dev-lc-electronic-wordpress]/returns: executed successfully
Notice: /Stage[main]/Tepco::Create_tepco_autoscaling_group/Exec[dev-asg-electronic-wordpress]/returns: executed successfully
Notice: /Stage[main]/Tepco::Create_tepco_autoscaling_group/Ec2_scalingpolicy[dev-asg-policy-electronic-wordpress]/ensure: created
Notice: /Stage[main]/Tepco::Create_tepco_autoscaling_group/Exec[dev-lc-electronic-jenkins]/returns: executed successfully
Notice: /Stage[main]/Tepco::Create_tepco_autoscaling_group/Exec[dev-asg-electronic-jenkins]/returns: executed successfully
Notice: /Stage[main]/Tepco::Create_tepco_autoscaling_group/Ec2_scalingpolicy[dev-asg-policy-electronic-jenkins]/ensure: created
Notice: Applied catalog in 318.59 seconds
Chúng ta cần cải thiện thêm:
Thêm một module mới TersForm để giảm sử dụng aws cli trong việc tạo ra AWS Infrastructure
Puppet: kiểm soát các nguồn tài nguyên, CM, deploy dựa trên role:
+ Ansible: trigger parallel ssh EC2
+ Terraform: triển khai AWS Infrastructure (để che đi Puppet AWS Module bị thiếu)
Huy Ngo - Technical Consultant tại TMA Solutions

